Guide:Smithing
Work In Progress
This guide is currently based off player testing, and as such is a work in progress until all mechanics are known.
Smithing is the act of heating, hammering and forging metal. In anvil this is currently used for the creation of tools and weapons.
Smithing Basics
Your first introduction to the smithing system will be with bronze. Bronze items are very simple to make, requiring minimal setup.
Bronze Smithing
Bronze smithing basic requirements
| Stone Anvil |
Used to hammer your ingot into parts. Doesn't require a workshop |
| Furnace |
Used for smelting your fragments into ingots |
| Workbench |
Crafting your finished bronze tool |
| Flint Hammer |
A hammer for forming your bronze ingot |
| Bronze Ingot |
The Bronze ingot itself |
Your first setup will be to build your Stone Anvil and Furnace. Collect your Malachite and Cassiterite fragments and smelt them together in the Furnace to form your Bronze Ingot.
Once your ingot is smelted, place it in the stone anvil. You can then cycle through the available recipes to see which tool part you can craft. You can check in a Workbench to see which parts are used to make specific weapons and tools.
After you've made your selection, equip your hammer and LMB click while facing the anvil to hit the ingot. As you hit it, the ingot should form into the desired part. Once complete, take that part to the Workbench and craft your chosen bronze item.
Iron Smithing
The next tier of smithing is iron, which will require new smithing structures, and make use of new smithing mechanics in order to create iron items. The first of these requirements is the creation of a smithing workshop.
Setting up the Workshop
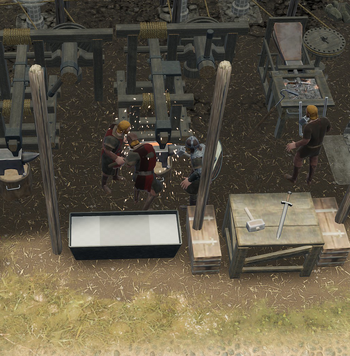
Your workshop is the area where more advanced smithing structures will be placed. It's created by placing and building a Workshop Area. Both types of manual and powered smithing structures are built within the bounds of this space so picking the correct location is important.
The most basic smithing workshops will require the following structures;
Workstations
| Anvil |
Used to hammer ingots into parts. |
| Forge |
Used to heat your ingots and tool/weapon parts. |
| Quenching Station |
Used to instantly cool the heated parts. |
| Advanced Workbench |
Used to combine your final parts into a finished tool or weapon. |
| Shallow Well |
You will also need a well or other source of water to fill your Quenching Station. |
Items
| Iron Ingot |
For forming iron tools and weapons |
| Flint Hammer |
Any kind of Hammer. Used to strike the Anvil, forming your parts |
| Coal |
Fuel for the Forge. Coal is recommended, but others can be used. |
| Water Bucket |
Needed for the Quenching Station. |
Depending on which tool you're aiming to make you will require extra resources, check the recipes in the Advanced Workbench.
Smithing Workflow
With your workshop complete and your resources ready it's time to actually start smithing.
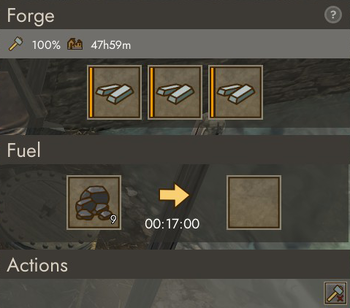
Take your Iron Ingots over to the Forge and place them within its inventory. Make sure its fueled and active, Coal is best due to it's long burn time but other wood fuels will work too. Without a powered Bellows we are limited to only 50% heat on our ingots and parts. This will increase the difficulty during forging and we may have to reheat our ingot or part multiple times back in the forge.
While your ingots are heating go to your Anvil and select which part you want to form. This is also a good time to check that your Quenching Station has been loaded with Water Buckets.
Once your ingot has reached its maximum available heat move it from the Forge inventory into the Anvils inventory. As soon as this is done you should immediately start to hit it with your Hammer by using LMB.
Be mindful of your hammers durability, it will be lost for each swing onto the anvil.
As you strike the Anvil you should notice the ingot starting to form into the part you're trying to make. Pay attention to the sparks and the sound. When your metal is too cold it will stop making particles and the sound will become higher pitch. If you're still trying to form your ingot its time to take it back to the Forge for a reheat. But be careful, if your temperature gets too low, or to high it will turn back into a raw ingot again.
Once your part stops changing shape its fully formed and ready to be quenched. If you're using a setup without a Bellows you will have a difficult time trying to form some parts. Lets look at that now.
| Part | Anvil Hits | Cold Temperature |
|---|---|---|
| Weapon Tip |
15.0 | 30% |
| Tool Blade |
10.0 | 40% |
| Axe Blade |
15.0 | 50% |
| Sword Blade |
20.0 | 45% |
As you can see from the above table some parts such as the Axe Blade and the Sword Blade are difficult or even impossible to craft unless you have a Bellows to reach a high enough heat.
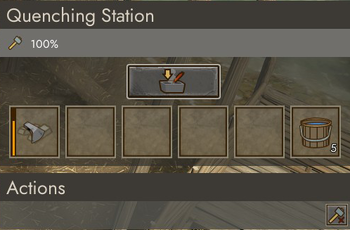
Once you've finished forming your part, it's time to quench it. Move your part from the Anvil or Forge to the Quenching Station having made sure it contains Water Buckets. Place the part into the inventory and use the quenching button when you're ready. This will instantly cool your part ready for use.
Simply take your part to the Advanced Workbench and combine it with it's other crafting ingredients to complete your tool or weapon.
Quality
There is more to iron smithing than simply forming a part and quenching it, and this is where quality comes into play. With increased quality comes increased benifits. Smithed parts can have one of four quality levels.
| None | |
| Low | |
| Medium | |
| High |
The quality level of smithed parts is currently based off two values; how formed your part is, aka its sharpness, and the temperature at the time of quenching. The exact formula for quality level is not yet known, though there are some observations from testing that can be reported.
- Each item has its own quenching temperature.
- Quenching a part that’s not completely formed seems to be the only way to have an item with no quality.
- With all other fully formed parts the quality level is based off how far from the optimum temperature you quench that part.
High Quality Quenching
The current known quenching levels for high quality parts is as follows:
| Part | Quench Temp |
|---|---|
| Axe Blade |
Can be quenched at 75/70% or the corner oh the back of the head. This will require a reheat in the forge |
| Sword Blade |
Can be quenched around 55%/45%, or just above where the cross guard would be attached. This 50% quench can be easily achieved by having another forge with no bellows attached. |
| Tool Blade |
Can be quenched around 20%, or inline with the bottom of the 2nd part. You can also hammer the part till the cold sound and then immediately quench. |
| Weapon Tip |
Can be quenched around 15%/10%, this will be outside of any icon marker. You can also hammer the part till the cold sound and then immediately quench. |
Powered Smithing
Coming Soon


