Guide:Getting started
Welcome to Calligo!
Even though Anvil Empires is in pre-alpha stage, this fictional land living through early middle ages won't show you any mercy. You will face many challenges on your way to dominate Calligo. This guide will help you to join a town or start your own!
Note: Currently, Anvil Empires Pre-Alpha tests will last anywhere from 6 hour sessions per day, to a persistent 120 hours over 5 days. Ultimately, however, the game will evolve into a 24/7 persistent world. If you wish to see how it will work, check out Foxhole, another game of Siege Camp. We also have a starting guide for Foxhole here.
Before signing up for the Pre-Alpha
Before signing up for the Pre-Alpha you should be asking yourself which of the following categories you fall under:
1) I am joining the Pre-Alpha to get a first glimpse of what Anvil Empires will be like
2) I am joining the Pre-Alpha to have a new "fun" game to play regularly
3) I am joining the Pre-Alpha to help the development team test out new ideas and provide feedback
If you fall under 1) or 2), then you should not join the Pre-Alpha at this stage or you will be significantly disappointed in the experience and you will not be a productive tester. If you fall under 3), then it's appropriate for you to join the Pre-Alpha as your contributions will be valuable. Please read our latest blog post for details:
- Markfoot from Siege Camp (on Anvil Empires Official Discord)
Even if you don't think you are fit for Pre-Alpha, you can wishlist Anvil Empires on Steam and check it again when it's released.
How to join Pre-Alpha?
If you want to help the development team test out new ideas and provide feedback as development continues, you can simply sign up for playtests on Steam. Sign-ups are currently only open just before a test starts, so it's recommended to join the Discord Anvil Empires Official Discord Server for announcements when sign-ups are active.
Bugs and Feedback
In order to gain access to the bugs and feedback channels in the Anvil Empires Official Discord Server you can link your discord and the game to gain a Pre-Alpha role.
- Click the "Claim your Pre-Alpha Discord Role" button on the in-game main menu
- Finish the authentication steps.
- On the Anvil Empires Discord, click the Server Name and then Linked Roles.
- Link your account and you will automatically be assigned the Pre-Alpha Access role
Once you have the role you should be able to see the feedback channels.
Controls
Basic
WASDMoveLeft ShiftSprintSpaceClimbLMBActionRMBAimRReloadEUse/InteractVDrop Item/Open GateQMount1Equip Left Hand2Equip Right Hand
UI/Menu
TabInventoryBBuild MenuUUpgradeMMapSpaceCenter MapEnterOpen ChatTPush to TalkOCinematic Mode/Hide HUD
How to play/spawn
Congratulations! You opted in to help developers by testing their game during this very early Pre-Alpha stage. The development team is waiting for your valuable feedback and suggestions. Now, keep an eye on Anvil Empires Discord Server and wait for the next test to start. After servers comes online, launch Anvil Empires and click Play.
You will be prompted with a Faction selection screen. Currently only available factions are Remnants and Ancients, a third Faction, Pagans will be introduced later on.
Note: Currently, the only differences between the factions are character aesthetics and spawn locations. Remnants spawn in the north, and the Ancients spawn in the south.
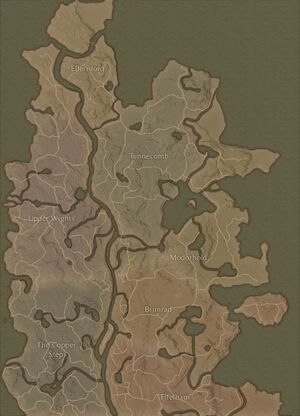
After deciding on your Faction, you should see a world map with campfire icons, these are wild spawns and are locations you can select to spawn on before you're part of a town. Select one of them and spawn into Calligo!
Towns and Homesteads
Homesteads are your primary location for building and progression, while towns act as regional hubs allowing trading, storage and processing of more advanced construction materials.
If this is your first time in Anvil Empires, you will have easier time by joining an existing homestead. Press M to open the map and check for any already established towns, you will want to build or join a homestead with one nearby. They will be identifiable by a town name and one of 3 tiered town faction icons. If you've joined right at the start of a new test its possible you won't see any towns yet. Over the next 30 minutes you should see new towns being founded by others on your Faction.
After you've selected where you want to spawn uses the nearest avaliable wild spawn via the map. Once spawned start running towards your desired target location, as you run you should be looking for early resources such as Branches ![]() Berries
Berries ![]() Fibre
Fibre ![]() and Flint
and Flint ![]() ,its especially important to collect Branches
,its especially important to collect Branches ![]() which you will need to build a Homestead
which you will need to build a Homestead ![]() if none are available to join.
if none are available to join.
Currently the only way to find homesteads is to run within range of them, revealing their icon on the map. If you arrive at an existing homestead its recommended to ask around if they're looking for players, or if there are any Homestead Bed ![]() you can claim.
you can claim.
Joining a Homestead
In order to join a homestead simply run up to the structure and use E to interact with it. Once the homestead UI has opened look for an orange claim flag button in the bottom left of the menu. If this button is greyed out that means either the homestead is locked, or its at its population capacity. If its locked only an existing member of the homestead can unlock it.
Once you've joined a homestead you will need to also claim a Homestead Bed ![]() . This can either be built inside the homestead itself, or in another House
. This can either be built inside the homestead itself, or in another House ![]() within the homestead build radius. Claiming the bed follows the same claim pattern as the homestead. The bed will change colour from white to blue once claimed.
within the homestead build radius. Claiming the bed follows the same claim pattern as the homestead. The bed will change colour from white to blue once claimed.
Starting a Town
Towns are regional hubs that allow for the creation of a Town Marketplace ![]() for selling goods to other players and a Town Workshop
for selling goods to other players and a Town Workshop ![]() for crafting advanced building materials. They also allow the creation of Foundation Walls for building a castle or keep around the central town structure.
for crafting advanced building materials. They also allow the creation of Foundation Walls for building a castle or keep around the central town structure.
Starting your own town is no small undertaking requiring multiple people nearby to place the starting blueprint.
If you still want to start a town your first task is to scout around the map looking for a good location, pay attention to nearby resource mines or animal dens and select a location with enough wood for the future town. While scouting, gather any ground resources you see such as Branches ![]() , Berries
, Berries ![]() , Fibre
, Fibre ![]() and Flint
and Flint ![]() .
.
Take note, the player who places the blueprint will be the starting interim lord of the town once pledged.This player will have the default role of building in the town, having access to the towns silver, and be able to demolish these structures gaining full resources back. This will allow you to redesign your town later as it grows.
Other Basics
Building
Building in Anvil Empires is done via a blueprint system. Open the build menu which can be opened with B. You will see a row of tabs each containing structures or vehicles that can be placed and built. Hovering over each item will show a description and any build requirements needed, a common build requirement is the tool used for construction. The most common tool is any kind of Hammer, but other tool types can also be required. Selecting an item from the build menu will attach a blueprint version of that structure onto your mouse. Simply move your mouse and thus blueprint to your desired build location and click to place. If the location is unavailable a status message on screen will prompt you of any issue with the build location.
Once your blueprint has been placed you will need to actually build the structure by adding you resources to it, running up to the structure will display the required resources to build, simply have these resources within your inventory and hold down LMB to build. If its a structure that requires a hammer make sure the hammer is in your hands.
Expanding Resources
Now that you've founded or joined a homestead or town you will be in need of food, weapons, armour and resources to help your new town expand, grow and defend itself. Your town will need various kinds of resources to expand and upgrade its buildings, such as Wood Planks ![]() and Stone Bricks
and Stone Bricks ![]() . Planks especially will be essential to building up your town. You can acquire planks by chopping down trees with a Flint Axe
. Planks especially will be essential to building up your town. You can acquire planks by chopping down trees with a Flint Axe ![]() , picking up the logs with
, picking up the logs with E and carrying them to a Sawbuck ![]() . You can then choose in the Sawbuck
. You can then choose in the Sawbuck ![]() menu whether you would like to refine your logs into branches or planks, and then process your logs by chopping at the sawbuck with your axe. Later on in your towns's progression the processing can be automated with a Powered Saw Mill
menu whether you would like to refine your logs into branches or planks, and then process your logs by chopping at the sawbuck with your axe. Later on in your towns's progression the processing can be automated with a Powered Saw Mill ![]() .
.
Food and Eating
Food is an essential necessity in the game. Your character has a hunger bar that will gradually decrease over time. Your level of satiety caps your maximum health and stamina. That is, your health and stamina decrease along with your satiety and cannot increase above your satiety level. It is therefore important, especially in combat, to keep yourself well fed.
In order to eat, find or cook an item of food. Open your inventory with Tab. Now just click on the item of food in your inventory and it will switch into your primary tool slot. Press Tab again to close your inventory and 1 to raise your hands. Press LMB to eat.
The most basic food item in the game is the Bloodberry Field Bar ![]() . You can craft it from Berries
. You can craft it from Berries ![]() at the Firepit
at the Firepit ![]() . The fire pit consumes a fuel such as Fibre
. The fire pit consumes a fuel such as Fibre ![]() or Branches
or Branches ![]() to cook your berries. Once you have eaten, you can not eat the same type of food again for some time. Maintaining a variety of food sources is therefore important to make sure your satiety bar is high. More advanced food types like Trencher Bread
to cook your berries. Once you have eaten, you can not eat the same type of food again for some time. Maintaining a variety of food sources is therefore important to make sure your satiety bar is high. More advanced food types like Trencher Bread ![]() , Boiled Cabbage
, Boiled Cabbage ![]() and Grilled Whitefish
and Grilled Whitefish ![]() require an Oven
require an Oven ![]() or a Hearth
or a Hearth ![]() to prepare, respectively.
to prepare, respectively.
Advanced Topics
Mining
Many advanced buildings and upgrades require Stone Bricks ![]() to construct. You acquire stone by first locating a Stone Mine
to construct. You acquire stone by first locating a Stone Mine ![]() , building it up, and then mining the mineral nodes that spawn with a Flint Pickaxe
, building it up, and then mining the mineral nodes that spawn with a Flint Pickaxe ![]() which you can craft at the Workbench
which you can craft at the Workbench ![]() . Breaking the mineral nodes will spawn Rock Slab
. Breaking the mineral nodes will spawn Rock Slab ![]() on the ground, which you can process into Stone Bricks
on the ground, which you can process into Stone Bricks ![]() at the Stone Cutter
at the Stone Cutter ![]() . To acquire , after mining the iron nodes at the Iron Mine
. To acquire , after mining the iron nodes at the Iron Mine ![]() you put the Iron ore
you put the Iron ore ![]() into a Mineral Refinery
into a Mineral Refinery ![]() which will output Iron Ore Fragment
which will output Iron Ore Fragment ![]() which you can turn into ingots at the Furnace
which you can turn into ingots at the Furnace ![]() .
.
Animal Taming
There are currently two types of animals you can tame: Horses and Donkeys. In addition you can lure, but not tame, Chickens. To tame horses or donkeys, you first need Equine Feed ![]() . You can craft it at the Mill
. You can craft it at the Mill ![]() from Cabbage Seed
from Cabbage Seed ![]() , which you can acquire either from harvesting Cabbage
, which you can acquire either from harvesting Cabbage ![]() or by gathering it from the ground, as it is a naturally spawning resource like Branches
or by gathering it from the ground, as it is a naturally spawning resource like Branches ![]() . Once you have equine feed, you need to find a horse or donkey Foal. These can be found wandering around in the wild. If you have equine feed equipped in your hand, the foal will start to follow you once you are close enough. You can then lead it to a Food Trough
. Once you have equine feed, you need to find a horse or donkey Foal. These can be found wandering around in the wild. If you have equine feed equipped in your hand, the foal will start to follow you once you are close enough. You can then lead it to a Food Trough ![]() . If there is enough equine feed in the food trough, the foal will start eating from it, and after a few minutes it will grow into a full-sized Horse or Donkey. Horses can be used to travel quickly in the world or to pull a Resource Wagon
. If there is enough equine feed in the food trough, the foal will start eating from it, and after a few minutes it will grow into a full-sized Horse or Donkey. Horses can be used to travel quickly in the world or to pull a Resource Wagon ![]() or a Caravan
or a Caravan ![]() . They are therefore useful for moving larger amounts of raw materials like Rock Slab
. They are therefore useful for moving larger amounts of raw materials like Rock Slab ![]() over longer distances. Donkeys can be used to power a Power Mill
over longer distances. Donkeys can be used to power a Power Mill ![]() . Tamed animals can be placed inside a Stable
. Tamed animals can be placed inside a Stable ![]() when not in use. If there is equine feed and water in the stable, the animals will eat from it. Horses and Donkeys must be kept fed or they may starve to death. To manually feed a horse or donkey, equip equine feed into your hand and press
when not in use. If there is equine feed and water in the stable, the animals will eat from it. Horses and Donkeys must be kept fed or they may starve to death. To manually feed a horse or donkey, equip equine feed into your hand and press LMB on the horse's mouth while standing in front of it. Your character will crouch and the equine feed will be consumed. Each equine feed restores roughly 30% of the animal's hunger bar.
Your Next steps
Once you have a handle on the basics of resource procurement and homestead and town progression, you can start to explore other areas of the game.


